
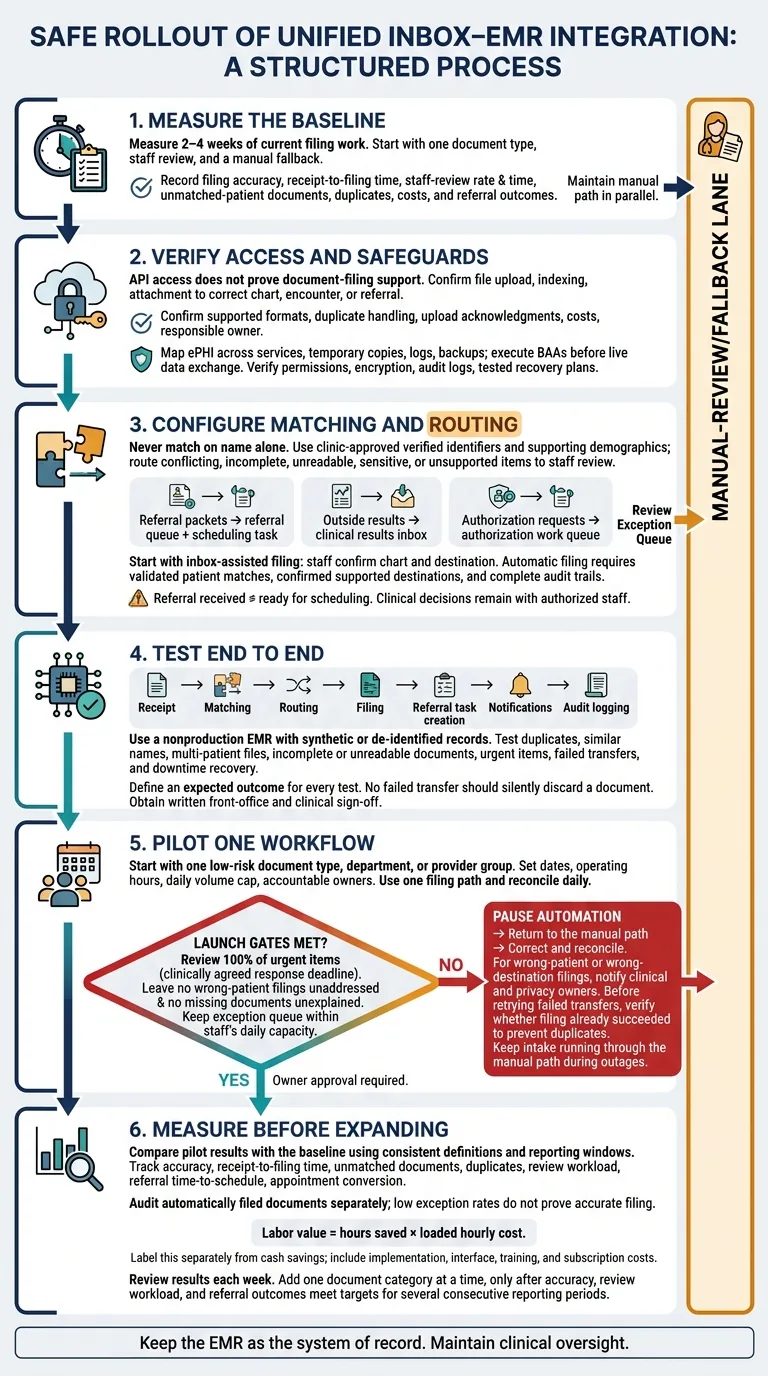
Start unified inbox to EMR integration with one document type, staff review, and a manual fallback. Measure 2 to 4 weeks of current filing work first, then expand only when the pilot meets accuracy and turnaround targets.
The setup should cover four areas:
- Access and privacy: Confirm the EMR can file documents - not just retrieve data - and check costs, HIPAA safeguards, vendor agreements, and recovery plans.
- Matching and routing: Use verified patient identifiers, define filing destinations and referral tasks, and send uncertain items to staff.
- Testing and launch: Test the path from receipt to filing, review 100% of urgent pilot items, and pause automation if safety checks fail.
- Results: Compare filing accuracy, staff time, total costs, and referral outcomes with the baseline. Audit automatic filings separately before adding document types.
The goal is more than getting files into charts: each document needs the right patient, destination, and follow-up.
Unified Inbox to EMR Integration: A Safe Rollout
Step 1: Verify EMR Access and HIPAA Safeguards
Check Interfaces, Filing Support, and Costs
Before live routing starts, use the document types in the workflow matrix to confirm that the EMR can receive and file documents without changing current staff steps. Ask the EMR vendor and IT lead to document the EMR version, hosting model, test environment, and available interfaces: FHIR/vendor APIs, HL7 v2, secure file transfer, and a document-import tool.
API access does not prove document-filing support.[5][6] Get written confirmation that the connection can upload files, map indexing fields, and attach documents to the correct chart, encounter, or referral - not just retrieve data.
Check supported file formats, size limits, duplicate handling, upload acknowledgments, and whether staff must index files manually. IT should verify authentication, separate test and production credentials, write permissions, and rate limits.
Request an itemized estimate covering setup, licensing, usage, support, and change requests. Assign one owner for configuration, testing, monitoring, upgrades, and failed uploads.
Define Data Access, Storage, and Recovery
Require a data-flow diagram showing every place electronic protected health information (ePHI) travels or is stored during automation. Include intake channels, the unified inbox, OCR/classification and patient-matching services, the integration layer, the EMR, temporary caches, rejected files, logs, backups, and subcontractors.
Document hosting locations, support access, retention periods, and deletion rules. HIPAA risk analysis must cover temporary copies, logs, and backups - not just the final chart.[1][4] Before exchanging live data, execute applicable business associate agreements (BAAs). These must cover permitted uses, safeguards, incident reporting, subcontractors, and data return or destruction when the relationship ends.[8]
Approve role-based permissions that limit access to each workflow.[2] Require separate service credentials for each service and multifactor authentication for administrators. Verify encryption in transit and at rest. Confirm that audit logs identify who searched, uploaded, changed, exported, or deleted information, and assign someone to review alerts and access activity.[3]
Document how failed files enter a queue, how staff handle downtime, and who reconciles the backlog without filing duplicates. Set a recovery-time objective - the acceptable outage length - and a recovery-point objective - the acceptable amount of data loss. Before enabling production access, agree on backup frequency and test restoration, urgent-document escalation, and safe replay of queued files.[7] Once these requirements are defined, move to intake, patient matching, and routing.
Step 2: Set Up Intake, Patient Matching, and Routing
Connect Intake Channels and Verify Patient Matches
Use the connection approved in Step 1 to start with one intake channel, such as inbound referral faxes. Diagna’s FAXFlo can receive, read, categorize, and route incoming faxes. Before routing live documents, confirm the EMR connection, filing destinations, and task actions.
For each document, record the original file, source channel, receipt timestamp, page count, document type, patient identifiers, referring provider, requested service, urgency, and missing fields. OCR can make scanned text searchable, but staff should check low-quality scans, handwritten or rotated pages, and multi-patient submissions. These intake fields guide patient matching and exception routing.
Never match on name alone. Follow clinic-approved rules that pair a verified identifier, when available, with supporting demographics such as date of birth, phone number, and address.[9][10] Send conflicting or multiple matches, unreadable scans, and incomplete documents to manual review with a documented reason. Keep the intake fields, match decision, and staff review history. Create patient records automatically only when clinic policy explicitly allows it.
Set Filing Destinations and Referral Tasks
Assign each document type a supported destination, an owner, and a next action:
- Referral packets go to the referral queue with a scheduling task.
- Outside results go to the clinical results inbox.
- Authorization requests go to the authorization work queue.
Keep attachments together and preserve page order. Before creating another item, compare the patient, document type, referring organization, service date, receipt date, and document identifiers. Review suspected duplicates before attaching them to an existing referral. Attach updated records to that referral and flag any changed information.
Send unsupported items to a staff inbox with instructions - don’t improvise a workaround. Once destinations are set, map referral statuses before turning on automation.
Diagna’s Referral Manager tracks referrals from receipt through scheduling. Confirm which statuses sync with the EMR and which stay only in the referral system. Keep received, incomplete, ready for review, authorization needed, and scheduled separate. Receiving a referral doesn’t mean it’s ready for scheduling. Clinical urgency and treatment decisions remain with authorized clinical staff.
Choose How Much Filing to Automate
Start with inbox-assisted filing. The system extracts fields and suggests a chart and destination; staff confirm the action.
Use manual filing for unsupported items and inbox-assisted filing for validated matches. Turn on automatic filing only for document types with validated patient matches, confirmed supported destinations, and complete audit trails.
Automatic filing depends on configuration, document quality, and EMR support - not extraction accuracy alone. Uncertain, conflicting, sensitive, or unsupported items still need staff review. Apply these rules to the first pilot workflow in Step 3.
Step 3: Test and Pilot One Workflow
Test the Workflow From Receipt to Filing
Run the configured patient matching, destination mapping, and referral task creation in a nonproduction EMR using synthetic or de-identified records. If you must use production test patients, label them clearly and monitor their use.
Test the full path: receipt, matching, routing, filing, referral task creation, notifications, and audit logging. Include similar names, duplicate or multi-patient files, incomplete referrals, unreadable scans, unsupported formats, urgent items, failed transfers, and downtime recovery. Define an expected outcome for every test. No failed transfer should silently discard a document.[11][12][13]
Compare each result against a test matrix that covers the intended patient, EMR destination, metadata, permissions, receipt and filing timestamps, and audit history. Open documents in the views staff actually use. Check for duplicate charts, overwritten files, and access by anyone without permission.
Get written sign-off from front-office staff and clinical reviewers. Record known limitations, required manual checks, escalation contacts, and stop conditions.[14] Use the test matrix to decide whether the workflow is ready for a limited live pilot.
Launch a Pilot With Review and Rollback Plans
Start with one low-risk document type, department, or provider group. Set start and end dates, operating hours, and a daily volume cap. Name owners for intake, clinical, technical, and privacy responsibilities. Train staff to handle successful filings and exceptions with a one-page decision guide.
Use one filing path so documents aren't filed twice. Assign responsibility for daily reconciliation, and hold brief reviews during the first several operating days.
Set launch gates before processing live documents:
- Review 100% of urgent items, with a response deadline agreed on by clinical reviewers.
- Leave no wrong-patient filings unaddressed and no missing documents unexplained.
- Keep the exception queue within what staff can clear the same business day.
Expand only after owners approve delivery reliability and confirm that staff can still clear exceptions that day.
If the pilot misses any launch gate, pause automation and return to the manual path. Write and rehearse the recovery plan before you need it. Preserve failed transfers and their error details. Before retrying, check whether filing already succeeded; send repeated failures to the exception queue.
For wrong-patient or wrong-destination filings, pause the affected automation and notify clinical and privacy owners. Correct the record under EMR policy and document every action.
During an EMR outage or rollback, keep intake moving through the existing manual path. Maintain a secure, timestamped log and escalate urgent items directly. After recovery, reconcile every held document against the EMR and record receipt and filing times before restarting automation.[2][15]
Conclusion: Measure Results Before Expanding
After the pilot, compare results with baseline data and expand only if targets are met. Keep the EMR as the system of record, maintain clinical oversight, and avoid automating every document type at once.
Track Filing Accuracy, Staff Time, and Referral Outcomes
Measure receipt-to-filing time, filing accuracy, unmatched-patient documents, duplicates, staff-review rate, and review time against the baseline. Track referral time-to-schedule and appointment conversion using the same definitions and reporting window. These metrics help confirm whether automation saved time without reducing accuracy - and whether the workflow is ready to expand.
Audit automatically filed documents separately; low exception rates do not prove accurate filing.
Calculate labor value as hours saved × loaded hourly cost. Report this separately from cash savings so the clinic can assess time savings without assuming payroll costs will drop. Include implementation, interface, training, and subscription expenses when assessing financial impact.
Have the operations and clinical owners review results each week. Add one document category at a time, only after accuracy, review workload, and referral outcomes meet targets for several consecutive reporting periods.
FAQs
Can I integrate a unified inbox with an older EMR?
Yes. Diagna’s unified inbox/fax workflow can connect with older EMR systems without changing how senders submit documents. Secure API connections let you route documents and write them back to your EMR - without replacing it or disrupting your clinic’s current workflow.
How do I set realistic pilot accuracy targets?
Start by measuring daily fax volume, document types, and time spent on manual processing. Then track classification accuracy, exception rates, and time-to-schedule to set clear targets for pilot success.
Run AI alongside your manual process so staff can check its outputs. Set confidence thresholds that route ambiguous or low-quality documents to human review. As you fine-tune those thresholds and exception volumes stabilize, shift from parallel review to full automation.
How much staff training will integration require?
Training needs are limited because unified inbox integration with your EMR keeps interfaces and workflows familiar. Data entry and routing happen automatically behind the scenes.
Build staff confidence through hands-on practice with everyday tasks, such as routing referrals or retrieving lab results. Write clear instructions for new workflows, introduce changes in phases, and choose internal champions who can help teammates along the way.
Automated data entry
Diagna pulls patient, insurance, and diagnosis details off each document and enters them into the chart. No retyping.
See how Diagna automates EMR data entry